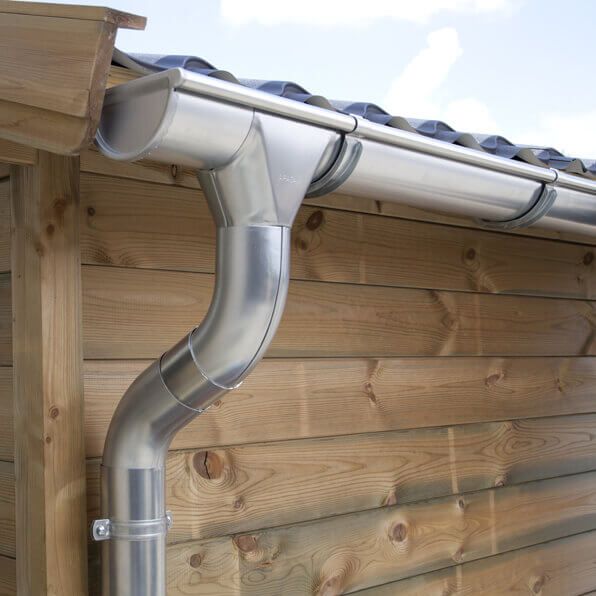
Discover the revolutionary RoofArt Guttering, a game-changer in the world of construction. This exceptional guttering system seamlessly combines practicality and aesthetics, going beyond its basic function of rainwater diversion. Crafted from top-grade galvanised steel, RoofArt Guttering not only efficiently channels water away from your buildings but also elevates the overall charm and elegance of exteriors.
Let's explore the outstanding features and benefits that set RoofArt Guttering apart from the rest. With its superior design that merges form and function flawlessly, it's no wonder why this guttering solution is rapidly becoming the preferred choice for professionals and homeowners alike. Prepare to be amazed by how RoofArt Guttering is rewriting the rules of the game!
Why Opt for RoofArt Guttering?
There are numerous reasons why RoofArt Guttering stands out as the ideal choice for homeowners, roofing professionals, and DIY enthusiasts. Take a look at the compelling advantages it offers:
-
Unmatched Durability and Strength: Constructed from high-quality galvanised steel, RoofArt Guttering is built to last. It withstands various weather conditions, from heavy rainfall to extreme temperature fluctuations, ensuring exceptional longevity and dependable performance.
-
Aesthetic Appeal: RoofArt Guttering goes beyond functionality and enhances the overall exterior of your building. With a wide array of colors and finishes available, it can be tailored to match any architectural style or personal preference, adding a touch of elegance to your property.
-
Easy Installation: Engineered with ease of installation in mind, RoofArt Guttering is a perfect choice for professionals and DIY enthusiasts alike. Its precision-made components ensure a seamless fit and a straightforward assembly process, saving you time and effort.
-
Low Maintenance: Thanks to the durability of galvanised steel and superior construction, RoofArt Guttering requires minimal upkeep. Regular checks and simple cleaning routines are usually sufficient to keep the system functioning optimally, allowing you to enjoy hassle-free maintenance and more free time.
-
Cost-Effectiveness: While the initial investment may be slightly higher compared to traditional options, RoofArt Guttering proves to be a more cost-effective solution in the long run. Its durability and minimal maintenance requirements result in significant savings over time.
Preparing for RoofArt Guttering Installation: Tools and Materials
Before diving into the step-by-step guide for installing your RoofArt Guttering, let's ensure you have all the necessary tools and materials ready for a smooth and efficient installation process. Creating a well-prepared workspace is key. Here's what you'll need:
- Gutter sections
- Gutter brackets and screws
- Downspouts
- Outlet connectors
- Gutter corners (if needed)
- End caps
- Gutter sealant
- Measuring tape
- Ladder
- Power drill
- Screwdriver
- Hacksaw
Step-by-Step Installation Guide for RoofArt Guttering
Now, let's take a closer look at the installation process for your RoofArt Guttering. Follow these steps for successful installation:
-
Plan the Layout: Begin by assessing your home's layout. Plan the locations for your downspouts and how the gutters will direct water to these areas. Consider the roofline slope and the architectural features of your home, aiming to effectively divert water away from the foundation.
-
Measure: Accurately measure the length of the roofline where the gutter will be installed. This measurement will determine the amount of guttering you need. It's advisable to purchase slightly more than measured to account for waste and potential errors.
-
Install the Gutter Brackets: The gutter brackets securely hold the gutter to your home. Depending on the chosen gutter type, either screw them directly into the fascia board or mount them on the roof. Adhere to the manufacturer's instructions regarding the bracket spacing, typically placing them every 2-3 feet.
-
Prepare the Gutter Sections: If required, trim the gutter sections to fit using a hacksaw. Use a gutter sealant to seal any seams for optimal performance.
-
Install the Gutters: Attach the gutter sections to the brackets, ensuring a tight and secure fit. Ensure the gutters have a slight slope towards the downspouts to facilitate proper water flow. As a general guideline, aim for a slope of 1/2 inch per 10 feet of gutter length.
-
Install the Downspouts: Start by installing the outlet connector on the gutter at the desired downspout location. Connect the downspout to this outlet, directing water away from your home's foundation.
-
Install End Caps: Place end caps at the ends of the gutter runs, applying an ample amount of gutter sealant to prevent leaks.
-
Test the System: Once the installation is complete, use a hose to run water through the gutter and down the downspouts. Observe for any leaks or areas where water pools in the gutter, ensuring optimal performance.
Remember, every installation is unique, and it's crucial to follow the specific instructions provided with your RoofArt Guttering product. If you have any doubts or concerns about the process, consulting or hiring a professional is recommended.
Safety First: Best Practices for Gutter Installation
It's essential to prioritize safety during the gutter installation process. Here are some key safety practices to keep in mind:
-
Use a Stable and Appropriate Ladder: Ensure that your ladder is in good condition, placed on a solid and level surface. For gutter work, an extension ladder is often a suitable choice. Never overreach; instead, reposition the ladder as needed.
-
Wear Protective Gear: Safeguard your hands with heavy-duty gloves to protect against sharp metal edges. Safety goggles are recommended to shield your eyes from debris or metal shards. If there's a risk of falling objects, wear a hard hat.
-
Avoid Adverse Weather Conditions: Refrain from working on the roof or a ladder during windy, rainy, or icy conditions. Wet surfaces can be extremely slippery and increase the risk of accidents.
-
Electrical Safety: Be cautious of any nearby power lines or electrical wires. Contact with these can cause severe harm or even be fatal. If your work area is close to power lines, consider hiring a professional.
-
Use the Right Tools: Always use the appropriate tools for the job and ensure you know how to use them correctly. Misusing tools can lead to accidents and injuries.
-
Clear the Area: Keep the ground area where you're working clear of people, pets, and potential hazards. Prevent accidents by avoiding the risk of falling tools or debris.
-
Be Aware of Your Surroundings: Maintain awareness of your position on the roof and the location of the edges. Keep your work area clean to prevent slipping or tripping hazards.
-
Don't Work Alone: Having someone present can provide assistance in case of an accident. They can also help stabilize the ladder and pass tools when needed.
-
Follow Manufacturer's Instructions: Adhere to the recommended installation guidelines and any specific safety instructions provided by the manufacturer.
-
Avoid Rushing: Take your time and work diligently. Many accidents occur when individuals rush through tasks.
If you feel uncomfortable or uncertain about any aspect of the installation process, it's safer to engage the services of a professional. Always prioritize safety above all else!
Choose Drainage Supplies Direct for Your RoofArt Guttering
At Drainage Supplies Direct, we specialize in offering top-quality RoofArt Guttering products, ensuring you find the perfect solution for your needs. With our extensive range of RoofArt options, you can confidently reach out to us via email at sales@drainagesuppliesdirect.co.uk, call us at 01752 466151, or conveniently order online 24/7. Start your journey to acquiring RoofArt Guttering today!

